


This User’s Guide is applicable to Appcar DiagFCA ver 1.7.
Getting Started with Appcar DiagFCA
Installing Appcar DiagFCA
To install the software run AppcarSetup.msi file.
Please read and accept the rules of the license agreement when installing the application.
Licensing
The first time Appcar DiagFCA opens after installation:
1️⃣ enter your Login Credentials on the Settings tab. You received username and password in the email after purchasing the license,
2️⃣ click Save button to save username and password.
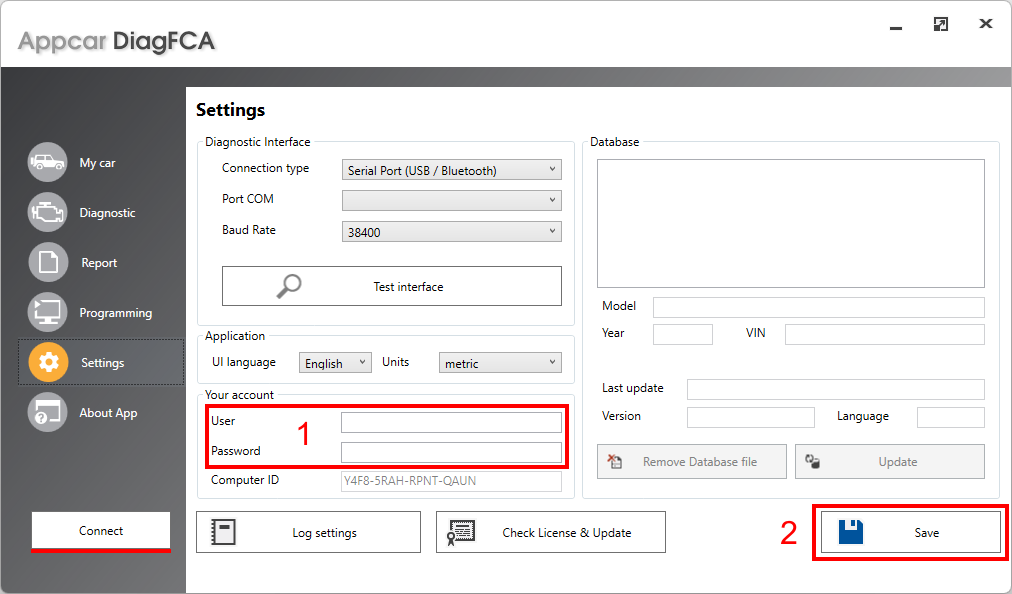
Here you can also set the UI language and units.
Connecting to the vehicle
Configure the connection depending on the type of OBD2 device.
USB adapter
Install device drivers from the adapter manufacturer. If you have any USB connection issues, first check that the latest drivers are installed.
Then connect the adapter to the USB connector and the DLC connector in the car.
Next, in Appcar Settings, set the connection type:
1️⃣ Connection Type: Serial Port (USB / Bluetooth)
2️⃣ Set the Connection details:
👉 Port COM:
the port number is assigned by Windows and may be different for each device,
OBD2 adapters are usually labeled as “USB Serial Port” or “USB-SERIAL CH340“.
👉 Baud Rate:
115200 for OBDLink SX, OBDLink EX, Vgate vLinker FS devices,
38400 for many other devices,
9600 try if none of the above work.

To try to establish a connection, click the main Connect button.
⚠️ When establish a connection, the ignition should be in the RUN position – otherwise some systems/modules in the car may not be available.
Bluetooth adapter
Bluetooth adapters schould be paired with Windows before the software can find and communicate with them.
How to pair the device with Windows:
Windows 10: Settings -> Devices -> Add Bluetooth or other device.
Windows 11: Settings -> Bluetooth & devices -> Add device.
Some devices require pressing a hardware button during pairing.
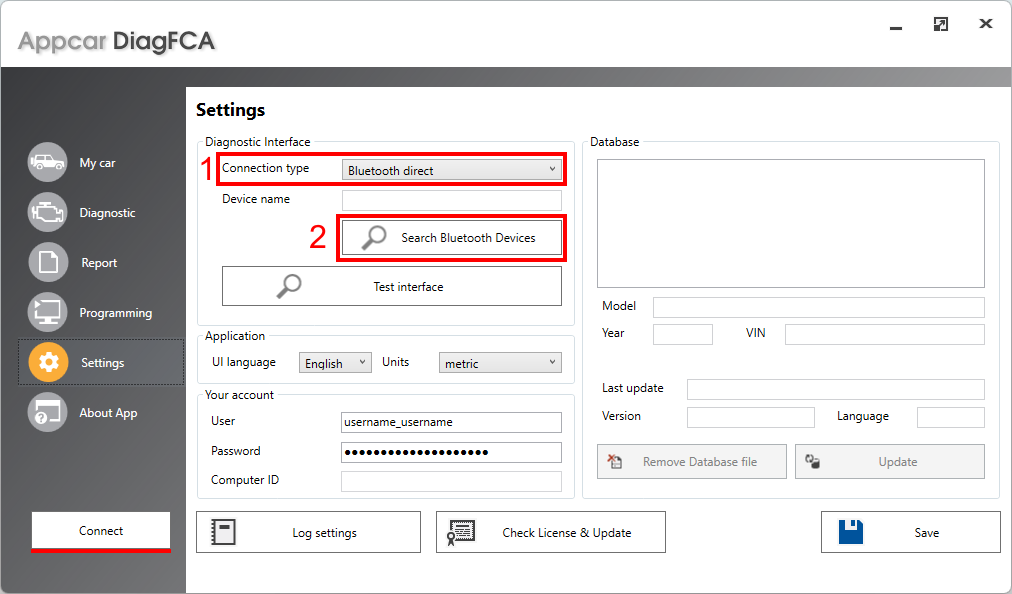
When the device is paired with Windows, set the connection type:
1️⃣ Connection Type: Bluetooth direct
2️⃣ To search for an adapter, click the Search Bluetooth Devices button.
⚠️ In case of bluetooth pairing issues, try to disconnect the pair in the Windows Bluetooth settings first, then restart the computer and try to pair using build-in Windows utilities again.
To try to establish a connection, click the main Connect button.
⚠️ When establish a connection, the ignition should be in the RUN position – otherwise some systems/modules in the car may not be available.
Connect vehicle
When you click the Connect button, Appcar will read OBD2 adapter details and recognize the VIN, model and year of the vehicle.
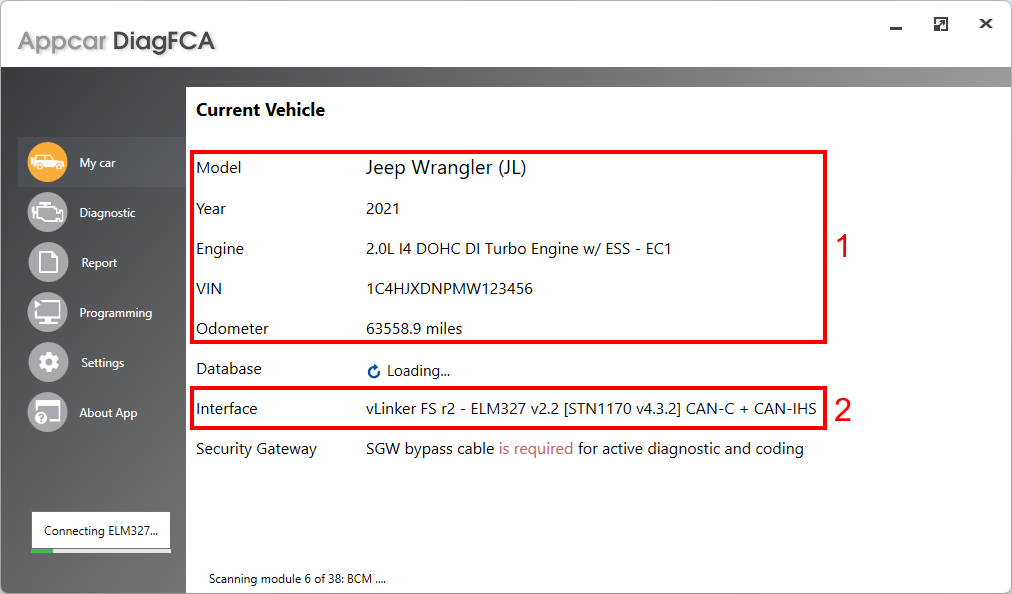
After a few seconds on the My Car tab you should see:
- 1️⃣ Vehicle details: VIN, brand, model, model year and acronym,
- 2️⃣ OBD2 adapter details: name, version, CAN networks supported.
⚠️ Troubleshooting
- If the interface details have not been read:
👉 wrong OBD2 device connection settings, no correct device drivers or a device not supported at all. - If you can see the interface details, e.g. ELM327 v 1.3, but the vehicle details have not been read:
👉 the OBD2 device connection settings are correct, but the adapter is incompatible (fake clone) or there is a problem with the CAN bus.
CAN bus management
Depending on the vehicle model, it can be equipped with one – 1️⃣, two 1️⃣ + 2️⃣ or three 1️⃣ + 2️⃣ + 3️⃣ CAN buses in the DLC diagnostic connector.
1️⃣ CAN-C – primary bus, also called CAN-HS. Supported by all OBD2 compatible devices.
2️⃣ CAN-IHS – optional bus, also called CAN-MS. An OBD2 interface that supports CAN-C/HS+IHS/MS or OBD2 interface with hardware CAN-HS/MS switch or additional Blue Adapter Lead (Adapter 5) is required.
3️⃣ CAN-CH – optional bus. An additional Grey Adapter Lead (Adapter 6) is required.
👉 Read more about CAN Buses, Recommended OBD2 Devices and Adapters Lead.
👉 Check in the Supported Vehicles tab which CAN buses your vehicle is equipped with.
If your OBD2 device does not support all CAN buses the car is equipped with, you will get a particular message.
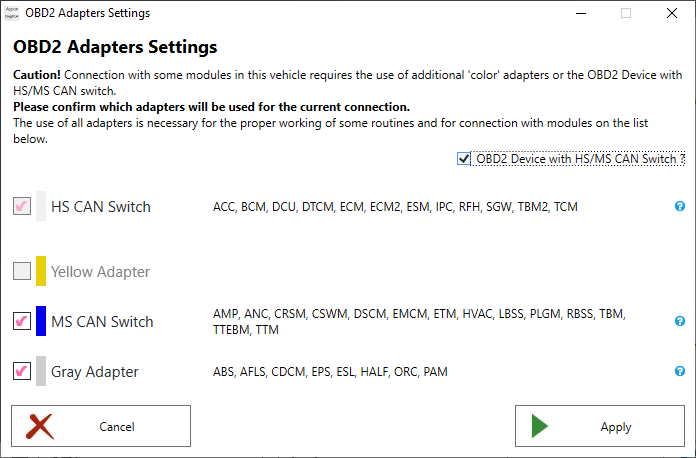
1️⃣ Select which adapters you will be using during the current connection with the vehicle.
2️⃣ Next to each of the adapters / CAN Bus name you can see a list of modules that work in this bus.
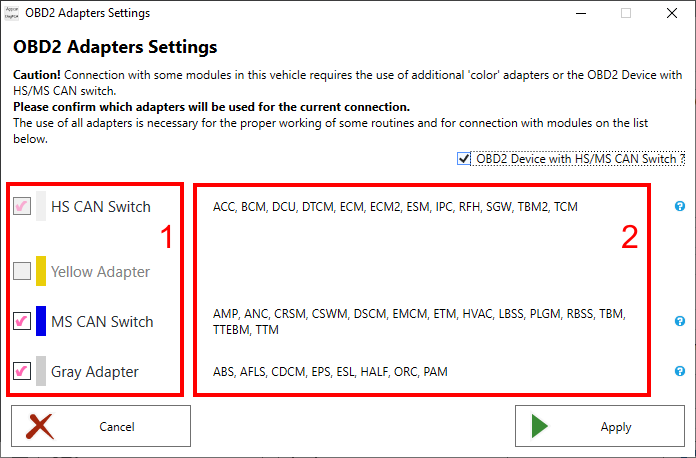
⚠️ When starting a new connection to the vehicle, connect the OBD2 interface directly to the vehicle – do not use the color adapters, and if your device is equipped with CAN-HS/MS switch set it to the HS mode. If needed, Appcar will ask you to use a color adapter or switch.
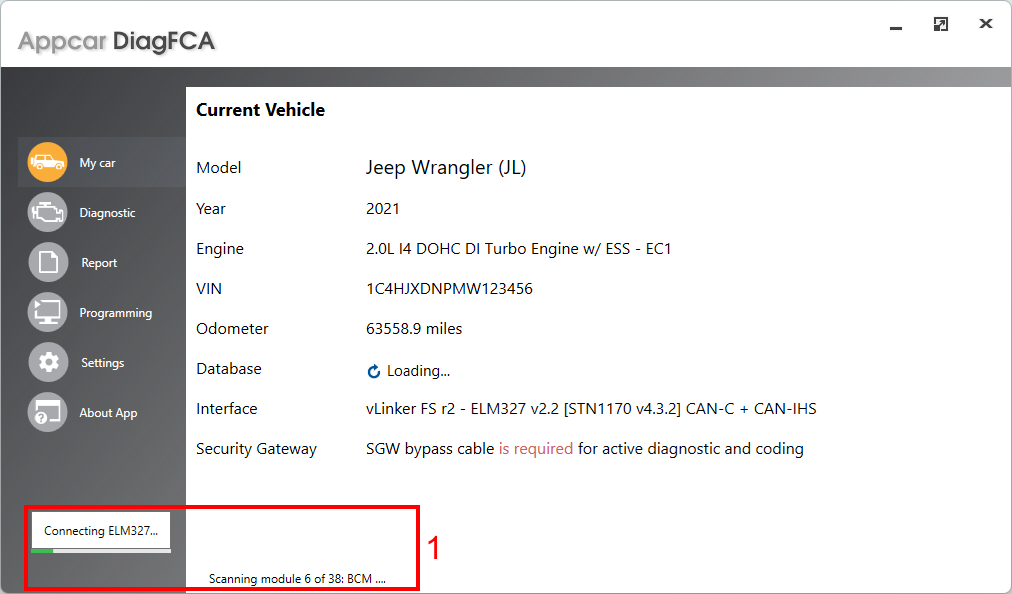
Scanning vehicle
When a vehicle is recognized, Appcar scans the CAN bus for available modules (ECUs). This can usually take 30 – 90 seconds, depending on the cars equipment.
You can see a green progress bar under the Connect button and the name of the module being scanned on the status bar.
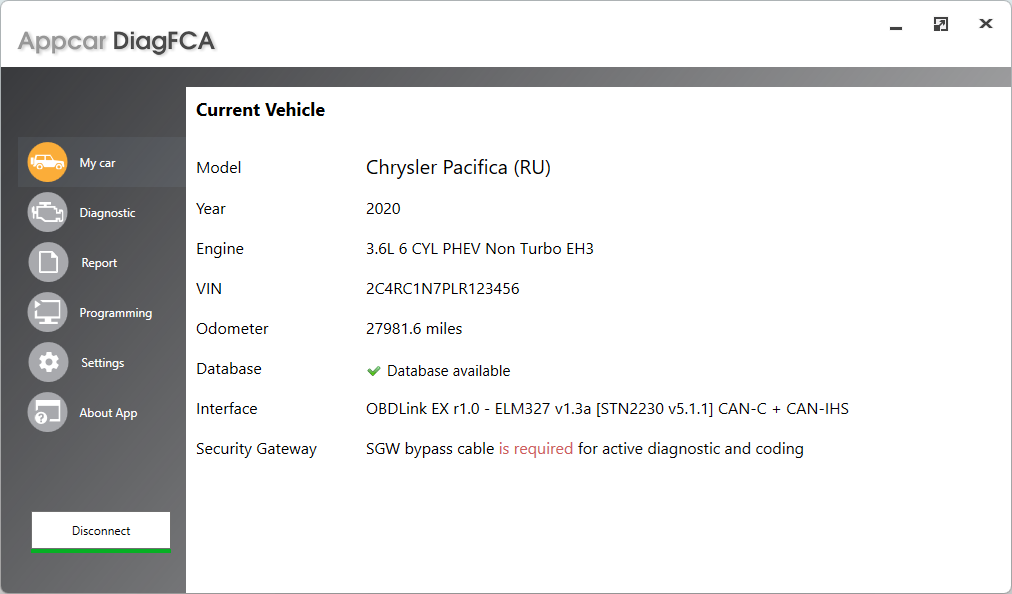
When the scan is complete, in the My Car tab, you will see the database status for this vehicle.

![]()
or
![]()
After the first connection to the vehicle, a one-time database download is required.
You have two ways to get the database:
A. If there is an active connection to the vehicle, click the “here” button in the My Car tab,
B. A second option that also works when disconnected from the vehicle. On the Settings tab, select VIN on the list and then click Update button. You can also use this way when you are no longer connected to the vehicle, e.g. you do not have internet access in your garage.
After downloading the database, you can use the features on the Diagnostic, Report and Programming tabs.
⚠️ Troubleshooting
- If you get a message that there is no internet connection:
👉 check if the ‘Check License & Update’ button on the Settings Tab works
👉 make an exception to the firewall
👉 check in the Windows settings if the default web browser is set or not defined (must be set)
👉 If an internet connection is fine, it looks like a Firewall/antivirus/Defender issue or your internet provider security settings. Eg. AT&T security settings with in the app may turn on blocking the database from downloading. Please check your internet provider settings. If possible, check your cellular connection. - If you get a message “Wrong username or password”:
👉 Access Forbidden message / error 401 means there’s a typo in the username or password.
Please enter the correct username and password and confirm changes by SAVE button. Username and password are case sensitive. - If you get a message “You do not have permission to download the database”:
👉 You no longer have free VINs in your license. Upgrade your license with additional VIN package to download the database.
My Car tab
The information on the My Car tab appears automatically after connecting to the vehicle:
- Vehicle details: VIN, brand, model, model year and acronym,
- OBD2 adapter details: name, version, CAN networks supported,
- Database status for the currently connected car,
- Security Gateway Bypass: is required or not required.
Diagnostic tab
Initially, the Diagnostic tab shows the list of modules in your car.
List of modules
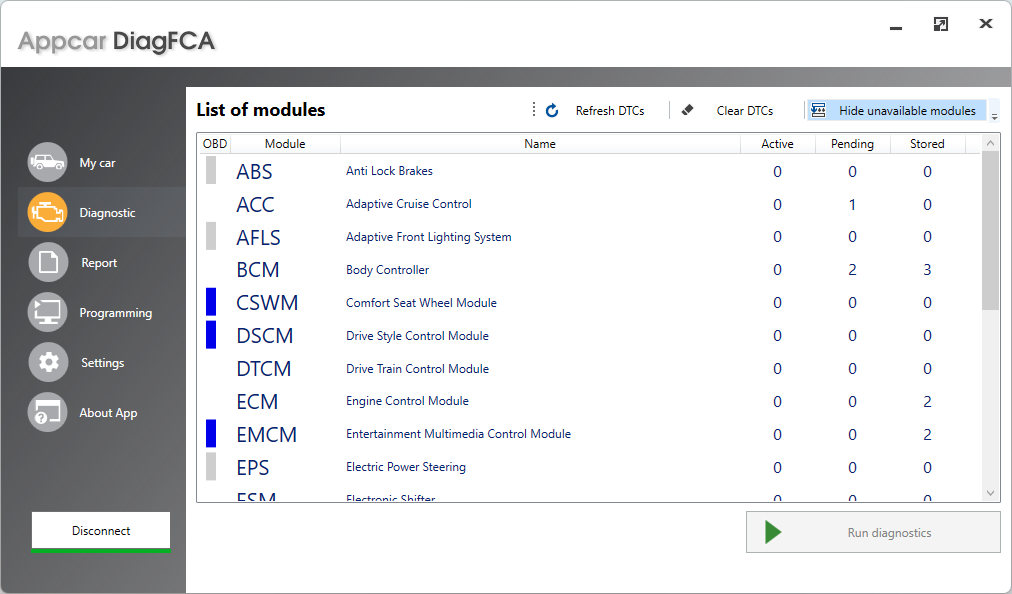
The list consists of three sections:
1️⃣ OBD Column – CAN Bus: white – CAN-C, blue – CAN-IHS, gray – CAN-CH. Shown only if your OBD2 interface does not support automatic CAN Bus switching,
2️⃣ Acronym and name of the module,
3️⃣ Active, Pending and Stored DTCs Fault Codes counter for each module.
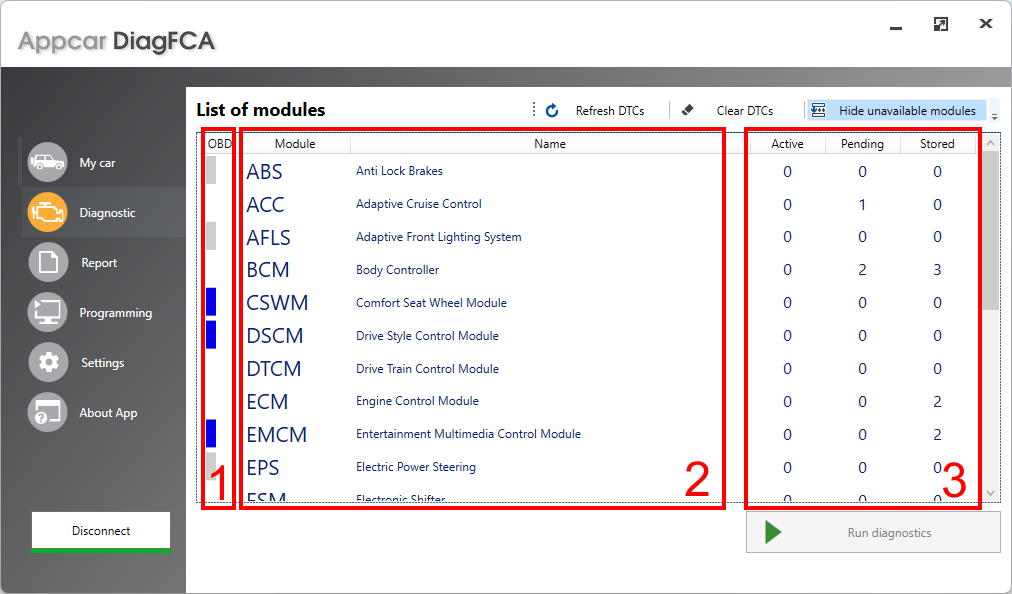
Double-click on the desired module or select it and click the “Run Diagnostics” button to go to detailed diagnostics.
Module info tab
This tab shows a list of identification and configuration parameters of the selected module.
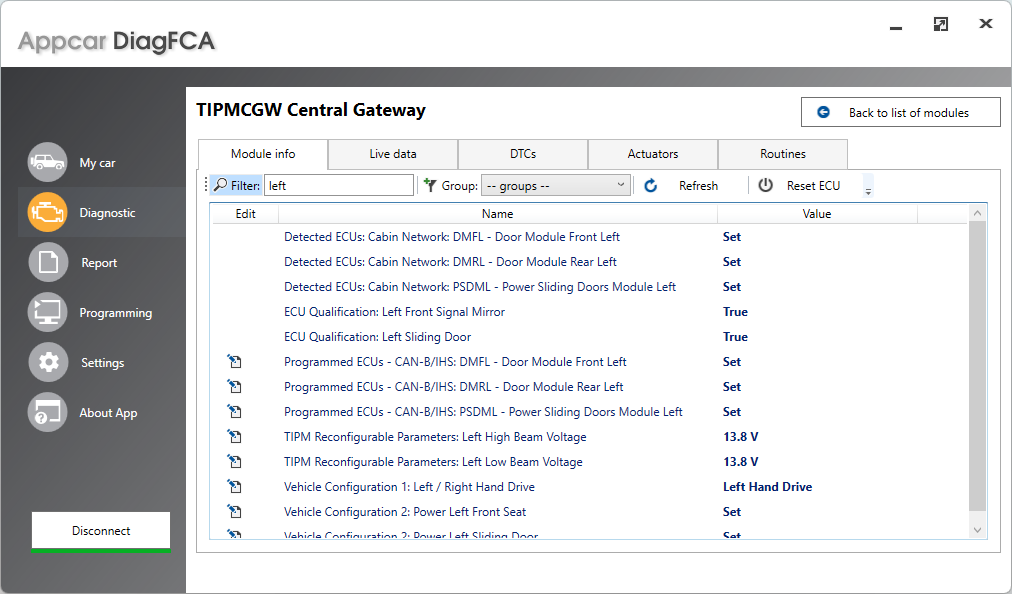
Toolbar
- Filter – Allows you to filter list based on the text contained in the filter field.
- Group – Applies a filter to the list to show parameters only related with eg. Remote Start, Theft Alarm, etc.
- Refresh – Reads data from the vehicle again and refreshes the list.
- Reset ECU – Power On Reset works as a momentary disconnection of power supply. Check the vehicle manufacturer’s documentation when this procedure can be used.
List
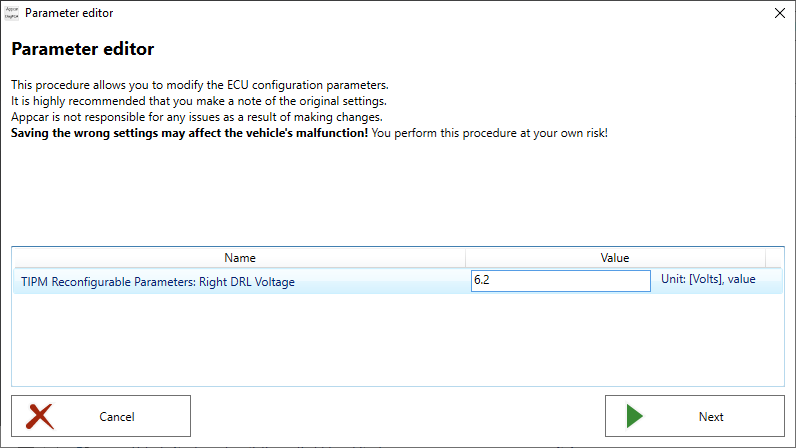
- Next to the editable parameters you will find an Edit icon. Click on the Icon to open Parameter editor window, which allows you to change the values.
Be very careful not to make changes unnecessarily! Choosing the wrong settings may disable the car.

Parameter editor window
Live data tab
This tab shows parameters or sensors value reading from the selected module.
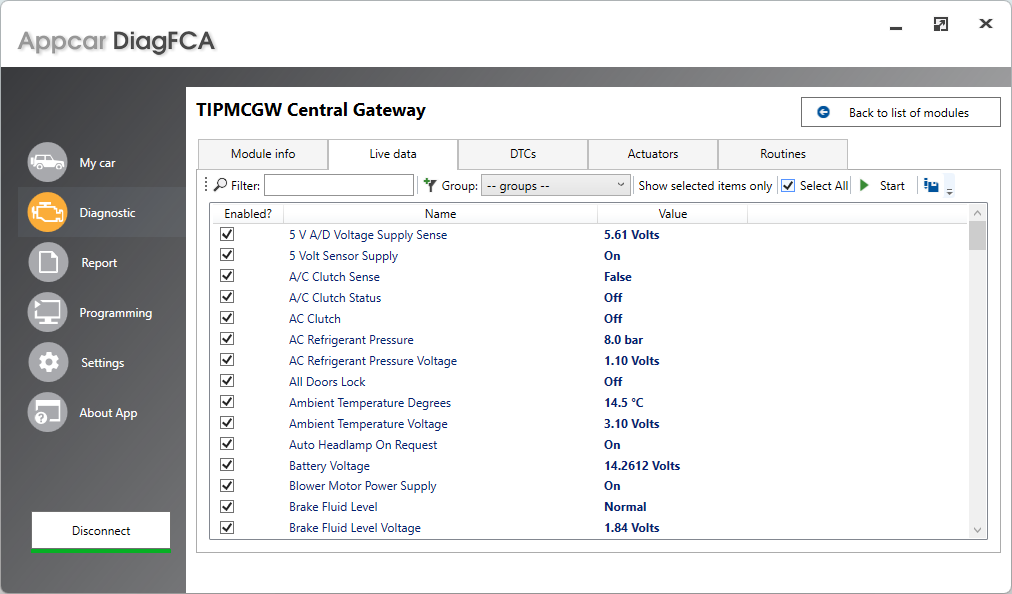
Toolbar
- Filter – Allows you to filter list based on the text contained in the filter field.
- Group – Applies a filter to the list to show parameters only related with eg. Remote Start, Theft Alarm, etc.
- Show selected items only button – leaves only selected parameters visible on the list.
- Select all button – check or uncheck the “Enabled?” checkboxes for all currently visible parameters.
- Start button / Stop button – click this button to Start / Stop refreshing the real-time values in the list. Refresh rate depends on how many parameters is selected and the performance of the OBD2 interface.
- Save to file button – click this button to save the data stream to the csv file.
List
- Next to each parameter you will find a checkbox. Only the values of those parameters are displayed and refreshed where the checkbox is selected.
DTCs (Fault Codes) tab
This tab shows a list of DTC trouble codes (fault codes) read from the selected module.
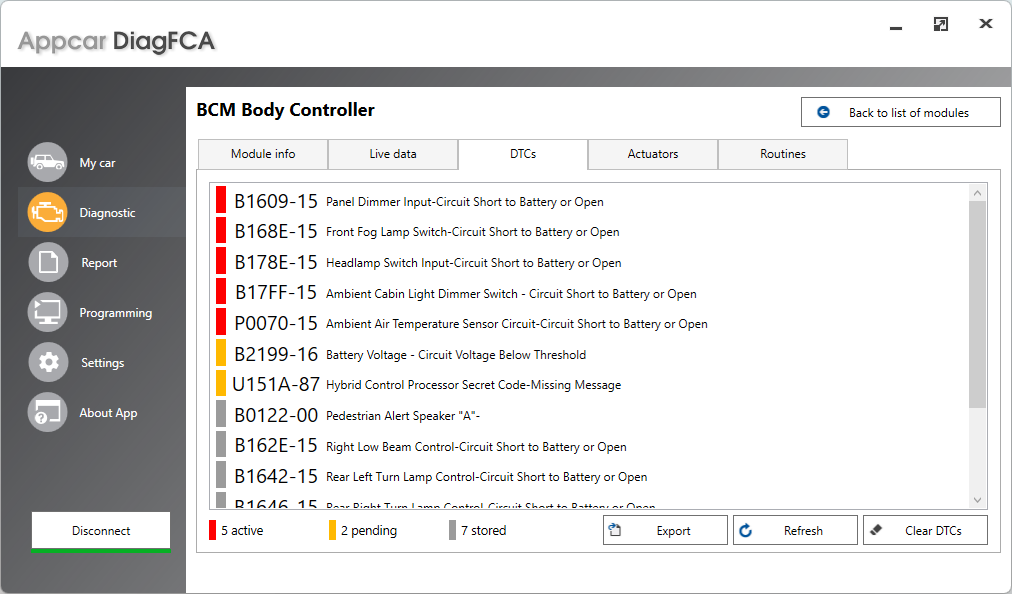
The color bar indicates the status of the fault code:
![]() the code is active
the code is active
![]() the code has pending status
the code has pending status
![]() the code has stored status
the code has stored status
The three buttons below the list allow you to:
- export the list to the clipboard or to a file,
- refresh the list,
- clear fault codes – usually, to successfully clear active fault codes, the cause of the fault must be repaired first.
Actuators tab
This tab allows you to control the actuators and tests available in the module.
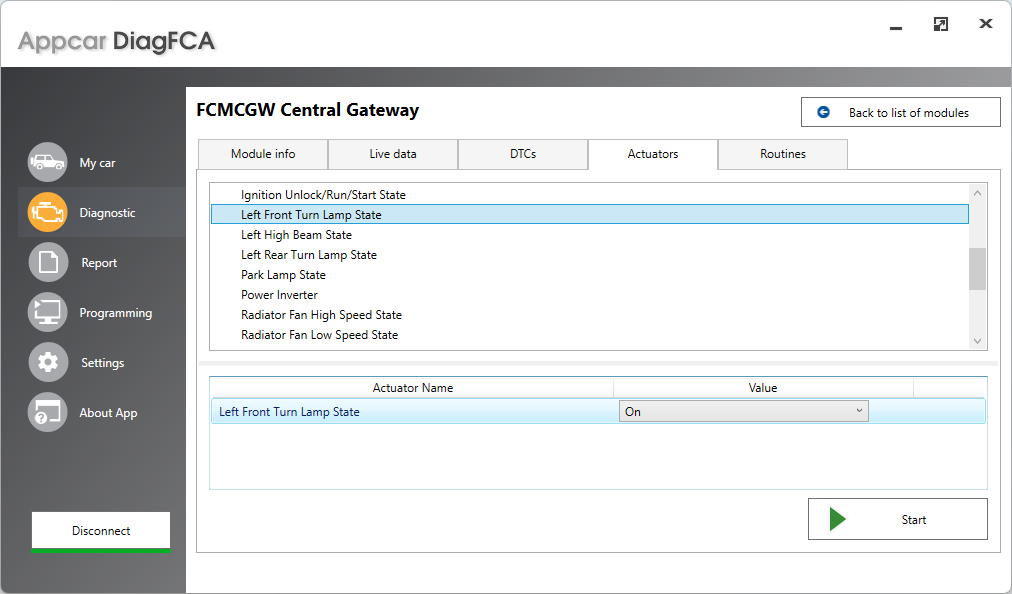
In the upper list, select the component you want to test, and then in the bottom list, set the required test parameters.
To start the test, click the Start button.
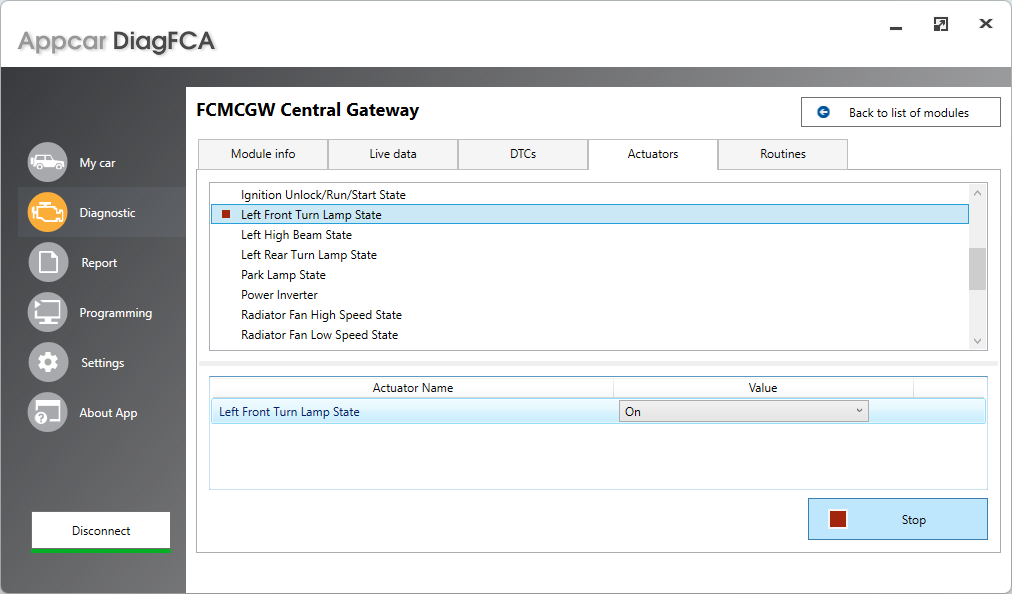
When the test is running, press the Stop button to stop it.
⚠️ Some tests and actuators require specific conditions to be met for starting (e.g. the engine must be running or the engine must be not running etc.). See the vehicles manufacturer factory service manual for details.
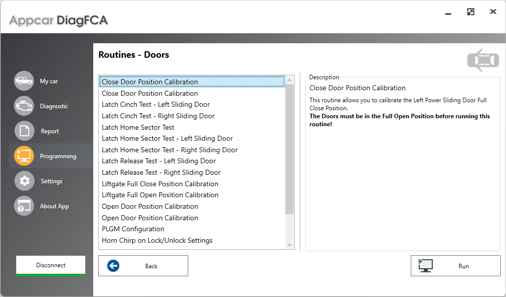
Routines tab
On this tab you will find diagnostic procedures, calibrations and other routines related to the selected module.
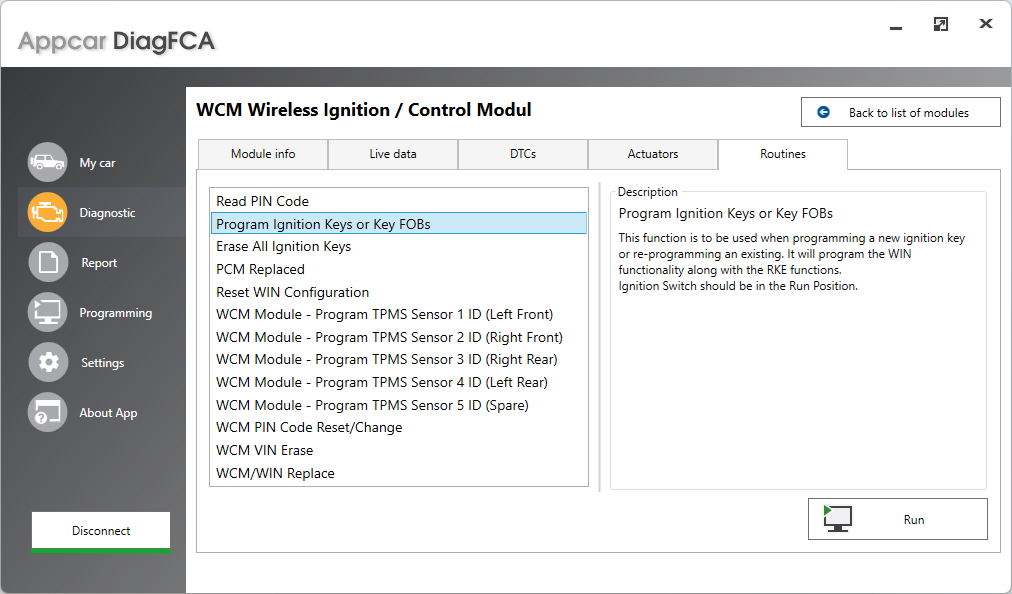
The picture above shows the procedures available for WCM v05.07 (Chrysler Town&Country 2012).
⚠️ The availability of the procedures depends on the module variant / version and the vehicle’s equipment.
⚠️ Refer to the Factory Service Manual for the details. Be careful and do not perform diagnostic procedures unnecessarily.
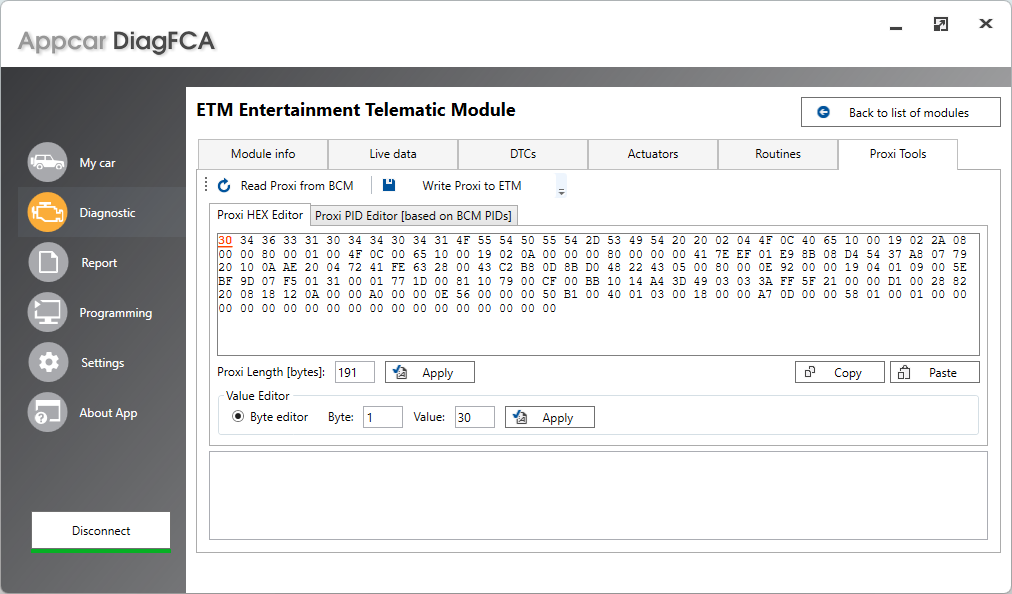
Proxi Tools tab
This tool is designed for advanced editing of Proxi Data.
This applies to vehicles with Proxi configuration only:
- Chrysler 200 UF
- Jeep Cherokee KL
- Jeep Renegade
- Jeep Compass MP
- Dodge Dart
- Alfa Romeo Stelvio
- Alfa Romeo Giulia
For other cars and for unsupported modules this tab is invisible.
⚠️ This tool is dedicated to advanced users only! It allows you to configure Proxi at an engineering level. It is highly recommended not to make Proxi changes unnecessarily!
Appcar Proxi Tool advantages
- Allows you to change the Proxi Data only in the selected module. Proxi in the selected module may be different than in BCM.
- If the module does not accept Proxi, a list of mismatch parameters is displayed.
- It is not necessary to perform Proxi Configuration Alignment after editing the Proxi Data in selected module (other than BCM).
⚠️ performing the Proxi Configuration Alignment procedure will overwrite the changes saved in the selected module with this tool.
See examples of using this tool:
- 2020 Alfa Romeo Stelvio 2.0 T – Drag Race / Performance Pages on the 8.8″ screen.
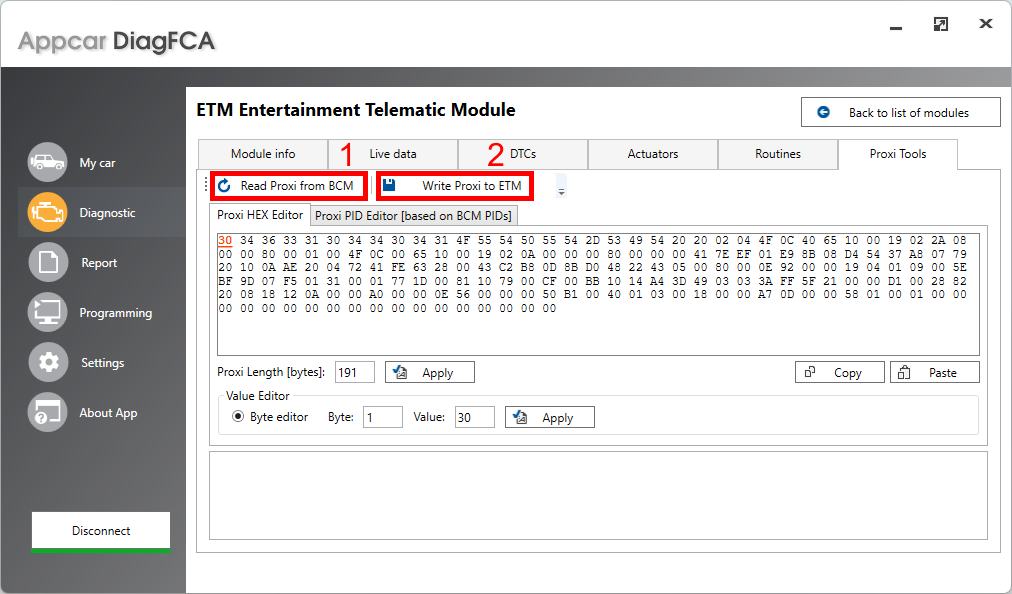
Main Features
1️⃣ Click the Read Proxi from BCM button to read the data from the BCM.
2️⃣ Click the Write Proxi to … button to write the Proxi Data to the selected module, when the data is ready to write.
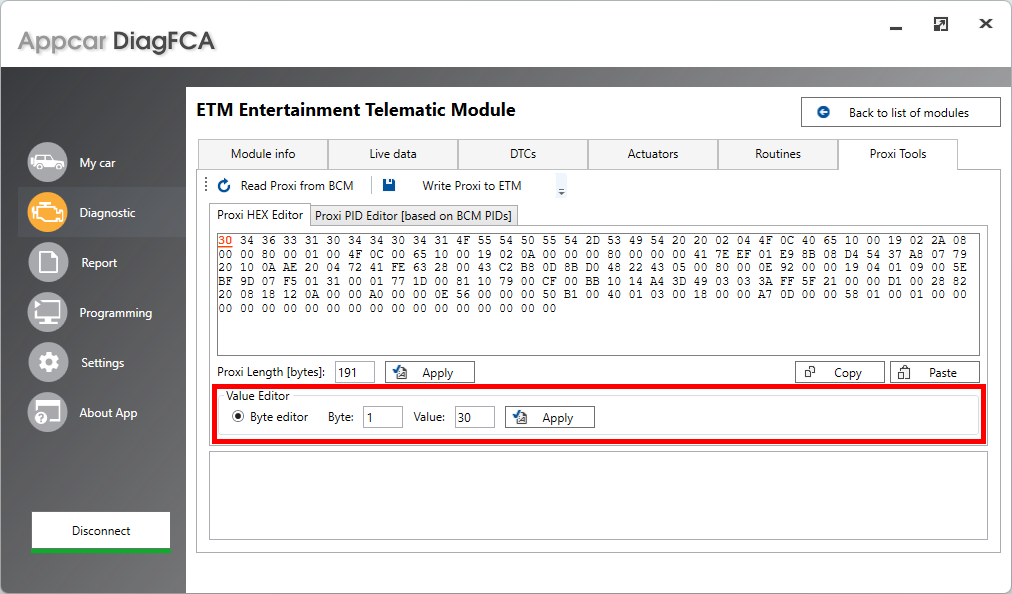
Proxi HEX Editor
This mode allows you to edit the Proxi Data as a set of bytes. You can copy or paste the entire Proxi data and change the Proxi data length.
To edit the value of a specific byte, use the Value Editor section.
Once updated data also updates in the PID Editor view, but is not written to the vehicle until you press the Write Proxi button at the top of the screen.
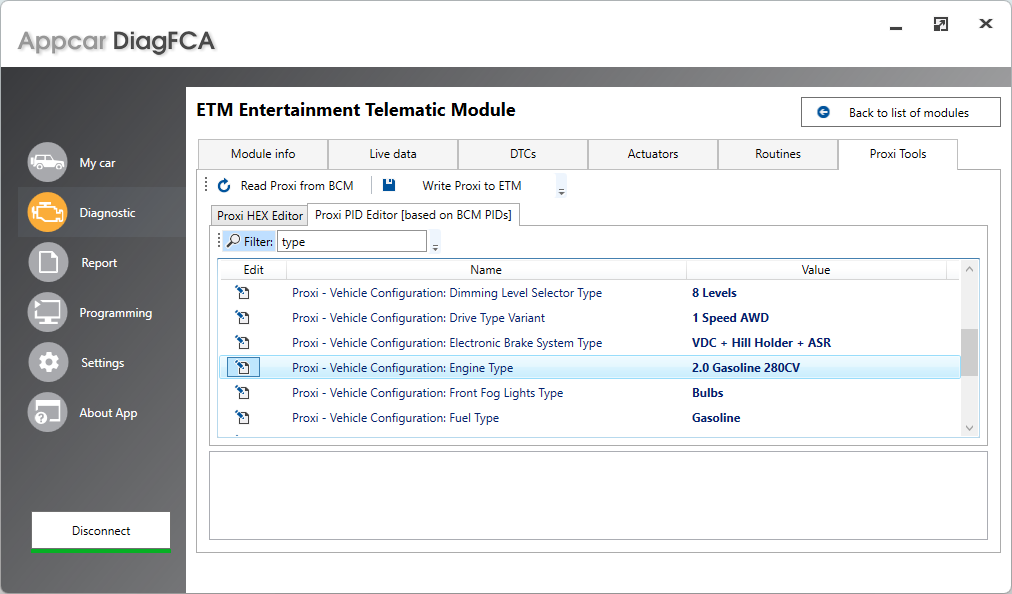
Proxi PID Editor
This mode allows you to edit the Proxi Data mapped to the list of parameters available for the BCM present in the vehicle.
Next to the editable parameters you will find an Edit icon. Click on the Icon to open Parameter editor window, which allows you to change the values.
The parameter edit window works the same as in the Diagnostics – Module Info tab.
Once updated data also updates in the HEX view, but is not written to the vehicle until you press the Write Proxi button at the top of the screen.
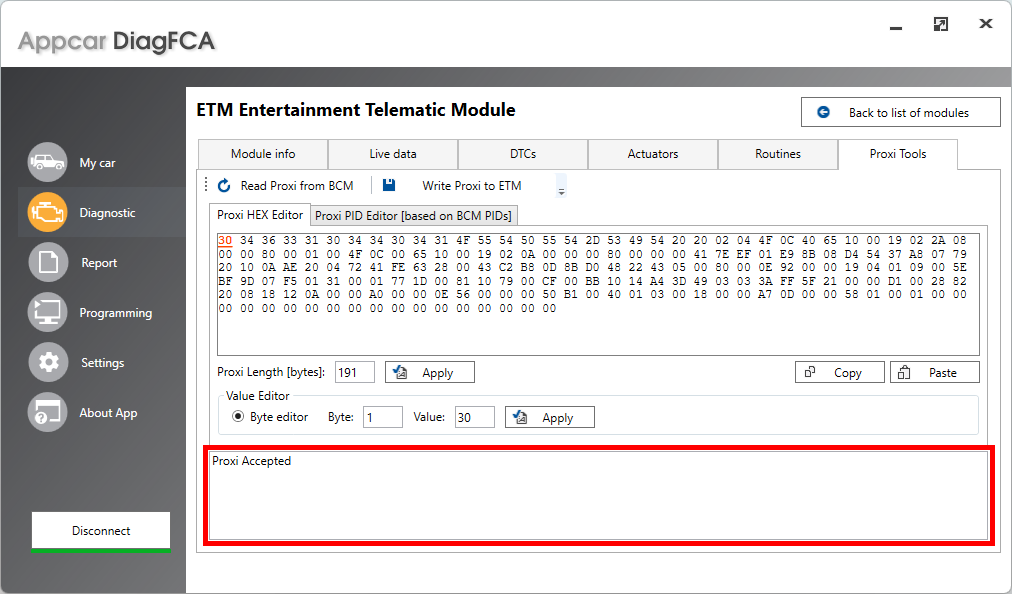
Writing Proxi
A summary of the attempt to save the Proxi Data will be displayed in the field at the bottom of the window.
Proxi Accepted means that the module has accepted the proxi data. The data writing was successfully completed.
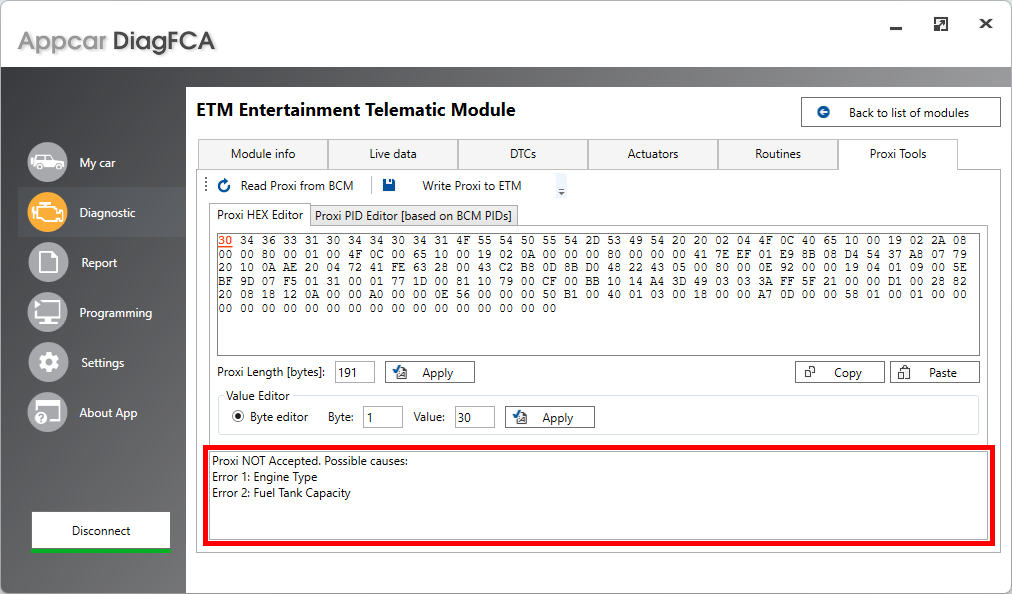
Proxi Not Accepted means that the module does not accept the current Proxi dataset. Usually a list of parameters that are not accepted will be displayed. The data writing was failed.
Report tab
On this tab you will find tools that allow you to create vehicle condition reports.
Fault Codes Report (DTC)
The Fault Codes Report (DTC) lists the available modules and fault codes for each module.
To view the report, click the Refresh button.
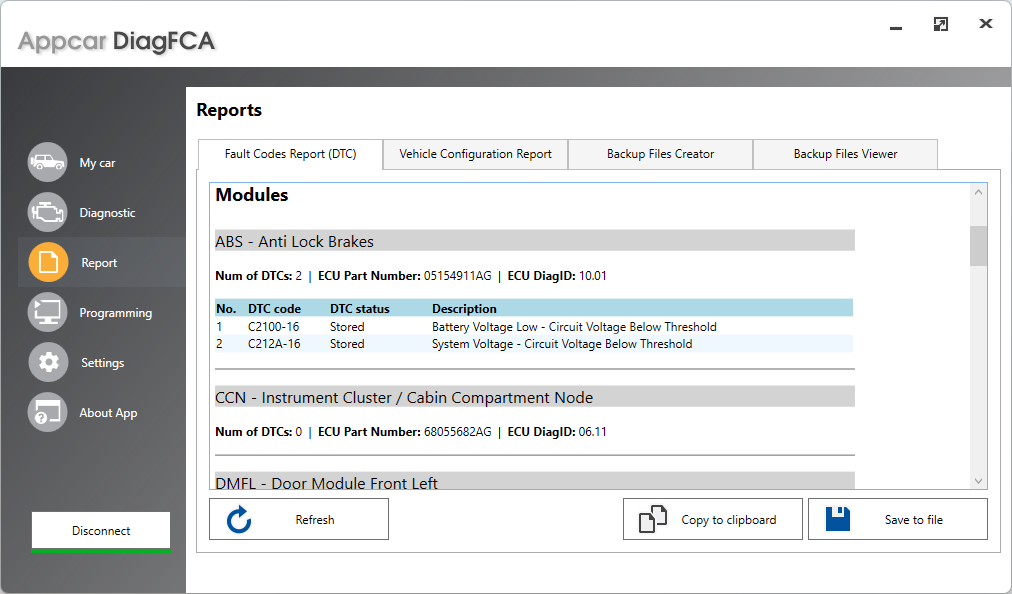
Use the buttons below the report to copy it to clipboard or save to file.
Vehicle Configuration Report
This tool allows you to build a vehicle configuration report. It contains identification and configuration parameters for each module / system available in the car.
To create a report, click the Build Report button. This can usually take 30 – 90 seconds, depending on the cars equipment.
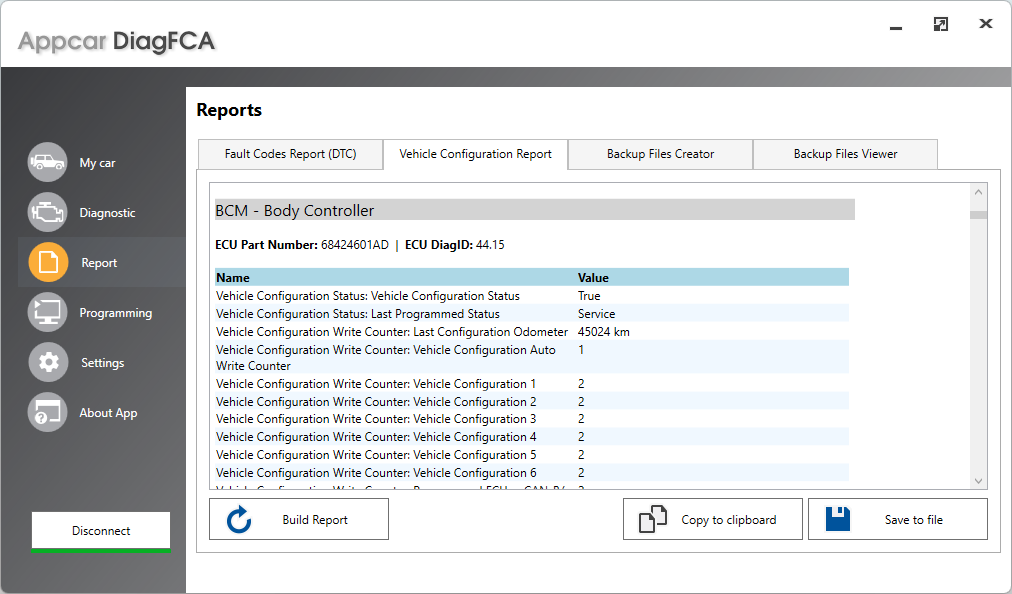
Use the buttons below the report to copy it to clipboard or save to file.
Backup Files Creator
This tool allows you to save to a file the current values of editable parameters from all available modules. You can edit these parameters on the Diagnostic tab -> module -> Module Info tab.
⚠️ It is highly recommended to create a backup report for each vehicle before making any configuration changes. In case of any issues, this may help you restore the original settings.
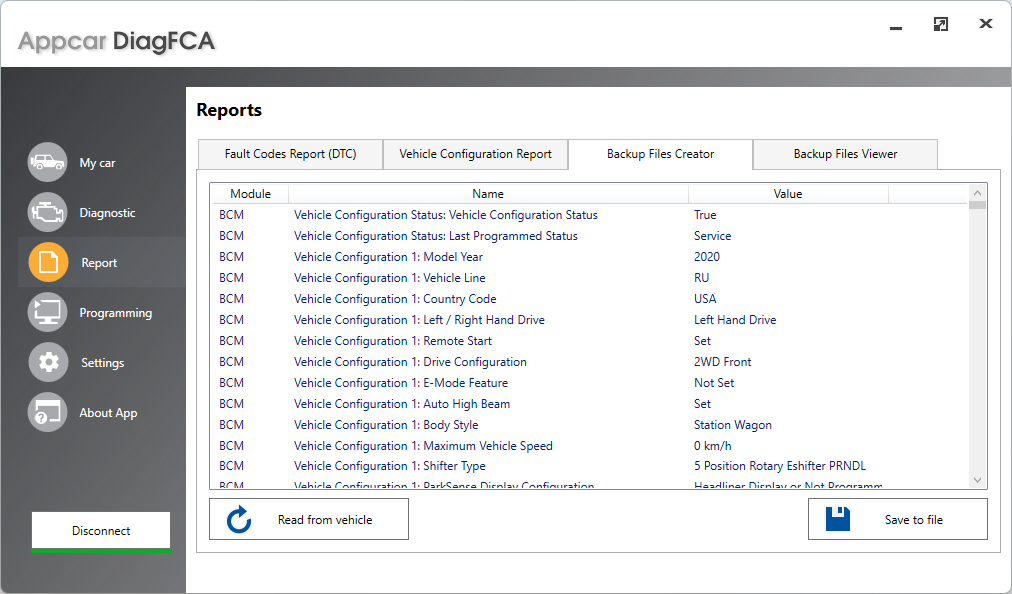
To create a report, click the Read from vehicle button. This can usually take 30 – 90 seconds, depending on the cars equipment. Then you can click Save to file button to save the data.
Backup Files Viewer
This tool allows you to view the Backup file and compare it with the current vehicle configuration.
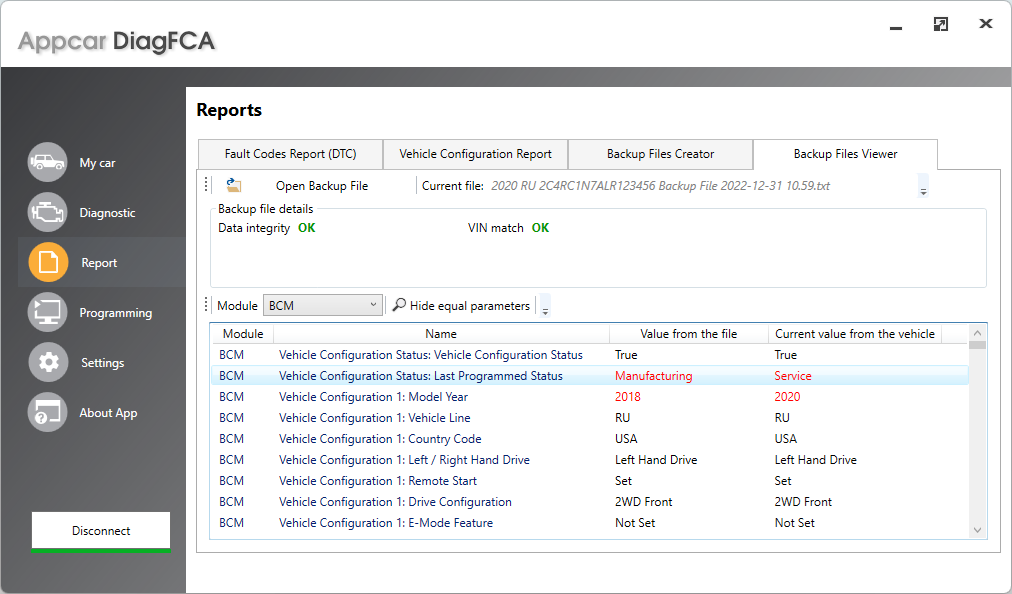
To load a file, click the Open Backup File button and select the backup file.
After loading the file, select the module to compare the data from the file with the current configuration from the vehicle.
If the parameter values are not equal, they will be marked in red.
Programming tab
On this tab you will find diagnostic procedures, calibrations as well as wizards of configuration changes, activation of equipment packages, etc.
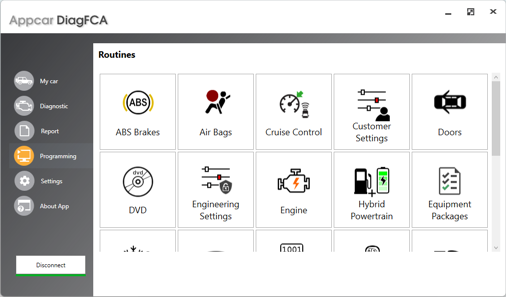
Procedures are grouped – up to 35 groups can be found here, depending on the vehicle’s equipment.
Sample procedures:
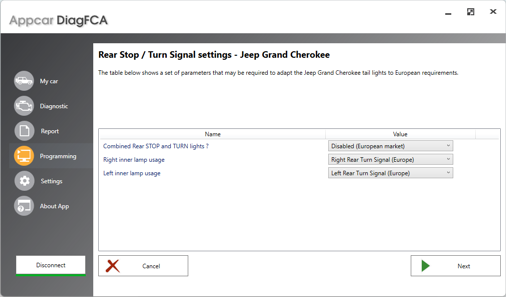
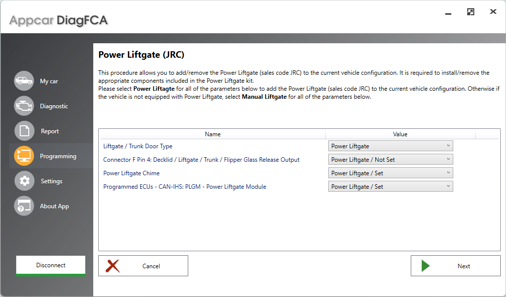
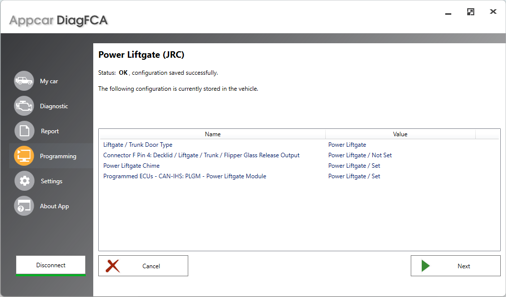
⚠️ The availability of the procedures depends on the module variant / version and the vehicle’s equipment.
⚠️ Refer to the Factory Service Manual for the details. Be careful and do not perform diagnostic procedures unnecessarily.
⚠️ It is highly recommended to create a backup report for each vehicle before making any configuration changes. In case of any issues, this may help you restore the original settings.
Settings tab
On this tab you can find an OBD2 device connection settings, login credentials and a list of locally available databases.